2026-10-20
Content
A biology teacher sets a pond-water sample on a microscope stage while a student uses a hand lens to check a leaf for insect damage. Across the room, another group measures pH, labels a preserved specimen, and records observations in a lab notebook. The tools in use are different, but the goal is the same: collect reliable evidence and explain what it means.
At a practical level, biologists use observation tools, measurement tools, dissection and specimen tools, models, field equipment, and safety gear. The exact list changes with the work. Cell biology leans on microscopes, slides, pipettes, and sterile culture tools. Ecology leans on nets, quadrats, sample bottles, thermometers, and cameras. Anatomy and veterinary teaching lean on dissection kits, preserved specimens, skeletal models, and organ models. Molecular work adds centrifuges, water baths, electrophoresis tanks, and pH meters.
The buying mistake is to start with a catalog. Start with the task, the learner, and the sample. A school that needs thirty students to observe onion cells has a different requirement from a college lab that prepares tissue cultures or a field class that surveys stream invertebrates. Once the task is clear, the tool list becomes shorter and more useful.
The compound microscope is still the signature biology tool. It magnifies cells, tissues, bacteria, protists, and thin sections. A typical student model offers 40x, 100x, and 400x total magnification, while advanced models add 1000x oil immersion. For insects, seeds, rocks, and dissection work, a stereo microscope gives a three-dimensional view at lower magnification and a longer working distance.
Microscope work depends on a support kit: clean slides, cover glasses, droppers, stains such as methylene blue or iodine, lens paper, and prepared slide sets. A digital eyepiece camera helps a teacher project an image to the class or save evidence for reports. In field biology, a hand lens or jeweler’s loupe often does the first quick check before a sample goes back to the lab.
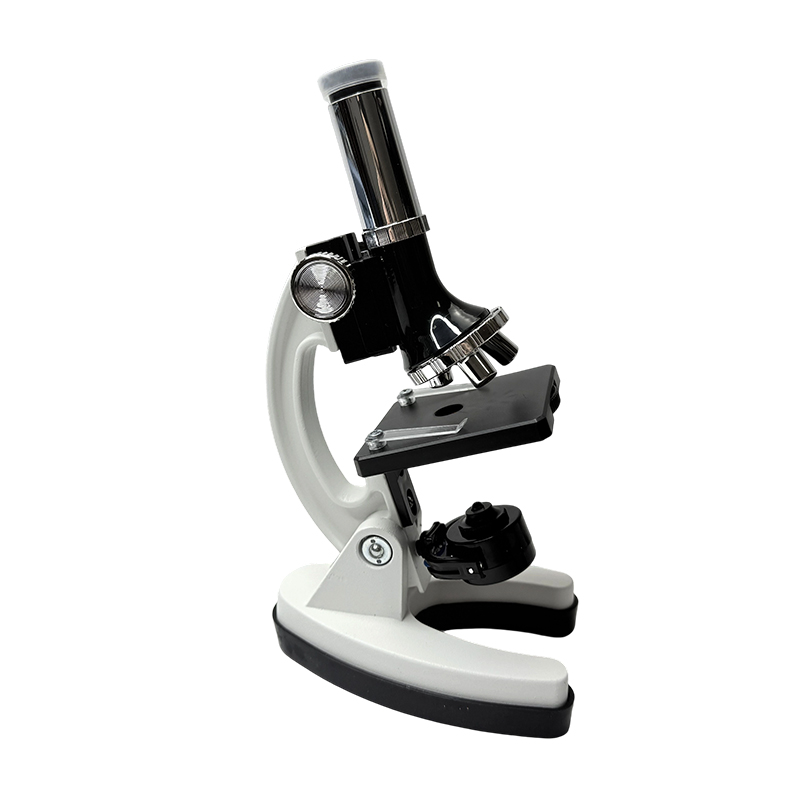 X0926 Biological Microscope for Junior High School BiologyBiological microscope for school labs, with 200X, 640X and 1000X specifications; suitable for observing biological slices, cells, bacteria, and other transparent samples.View Product →
When selecting microscopes, check the magnification range, illumination type, stage movement, and durability of focus knobs. LED illumination is efficient and cool, which matters when living specimens are observed. A mechanical stage is helpful for scanning slides at higher power. For younger students, simpler models with fixed eyepieces and sturdy stands usually survive better than feature-heavy instruments.
Many biology tools are also standard laboratory equipment. Graduated cylinders, beakers, Erlenmeyer flasks, test tubes, and volumetric pipettes measure and mix liquids. Balances measure mass. Thermometers, pH meters, and conductivity meters check conditions. Hot plates, water baths, incubators, autoclaves, and centrifuges control temperature, sterility, and separation.
These tools matter because biology is often a study of small differences. A buffer that is off by half a pH unit can change an enzyme reaction. A culture that is contaminated can ruin a week of work. A thermometer that reads two degrees low can mislead a student about respiration or fermentation. Accurate and repeatable measurement is therefore part of the biology, not just the setup.
Purchase decisions should focus on tolerance, calibration, chemical resistance, and replacement parts. Glassware with clear markings is easier to read, but plastic vessels reduce breakage in busy classrooms. For pipettes and pH meters, confirm that calibration solutions and spare tips are available. A tool that cannot be maintained will soon stop being a tool.
Dissection remains a common route for learning animal anatomy, especially in high school biology, veterinary programs, and medical foundation courses. A basic dissection kit includes a scalpel handle and blades, scissors, forceps, a probe, a teasing needle, and a dissecting tray. Preserved specimens may include frog, fish, lizard, rat, pigeon, or invertebrate examples, depending on the curriculum and local rules.
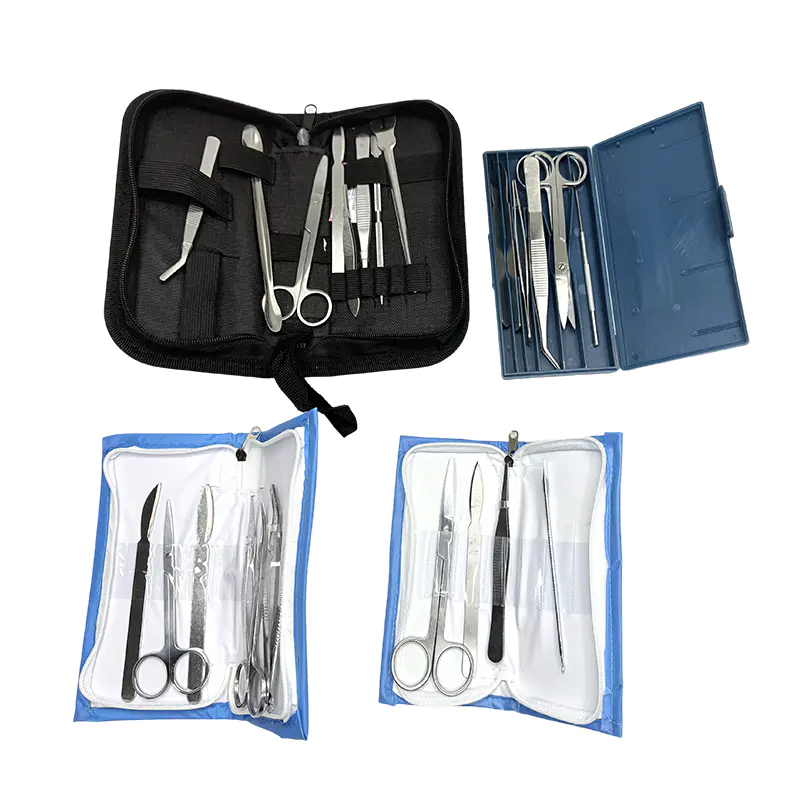 X0899 Veterinary Dissecting Kit and Student Dissection ToolsVeterinary and student dissection kit in 5-, 7-, or 9-piece sets, with scissors, forceps, scalpel handle, blade, and needle for specimen work.View Product →
Precision and hygiene drive the selection. Stainless steel instruments resist corrosion and can be sterilized. Replaceable blades stay sharp, which makes cuts safer and more accurate. Trays should be deep enough to contain fluid and easy to clean. Gloves, goggles, and proper ventilation are not optional accessories; they are part of the tool set. Schools should also check age suitability, storage, and disposal requirements before ordering specimens.
For programs that reduce or replace dissection, models and digital simulations can carry part of the learning load. They are most effective when they are used alongside observation, comparison, and explanation, not as a simple substitute for every hands-on experience.
Biology teaching often needs structures that are too small, too rare, or too delicate for routine handling. Cell models show membranes, nuclei, mitochondria, and chloroplasts. DNA models show the double helix. Flower, root, and leaf models explain plant anatomy. Human skeletal models, torsos, hearts, lungs, kidneys, eyes, and brains support anatomy and health science lessons.
Preserved specimens provide real structure and variation. Insect collections, plant herbarium sheets, shell specimens, and vertebrate skeletons help students compare organisms. Living observation adds another dimension: insect observers, fish tanks, animal cages, and incubators allow students to watch behavior, development, and life cycles over time. These tools connect a diagram to a living process.
 X1071 170cm Human Skeletal Model for Biology TeachingHuman skeletal model with detachable limbs, three-part skull, thorax, spine, and rotating hip joint for demonstrating anatomy in junior high biology classes.View Product →
Before purchasing models or live-observation equipment, match the item to the syllabus, storage space, and cleaning routine. A large skeleton model is valuable for demonstrations but needs secure storage. A small aquarium or animal cage requires a plan for feeding, water quality, and weekends. Preserved specimens need safe handling and proper ventilation. The best tool is the one the teacher can use repeatedly without creating a maintenance problem.
Field biologists carry a different kit from bench scientists. Binoculars and hand lenses support quick identification. Insect nets, sweep nets, and aquatic nets collect specimens from air, grass, and water. Quadrats and transect tapes frame ecological sampling. Sample bottles, forceps, and cool boxes preserve evidence. GPS units, compasses, field notebooks, and cameras record location and context. Portable pH meters, thermometers, and water-testing kits measure environmental conditions.
Safety tools travel with every group. Safety goggles protect eyes from splashes and flying particles. Nitrile gloves protect hands from preservatives, stains, and biological samples. Lab coats or aprons protect clothing. An eyewash station, first-aid kit, and spill neutralizer belong in every laboratory. In the field, sun protection, sturdy footwear, and a means of communication are basic planning items.
Field equipment should be lightweight, easy to clean, and durable enough for repeated transport. Look for nets with replaceable bags, bottles with leak-resistant caps, and meters with simple calibration. If the equipment is awkward to carry, it will stay in the cupboard, and the fieldwork will become a demonstration rather than an investigation.
Use the table below as a planning checklist. It groups common tools by purpose and highlights what to verify before purchase. The order is deliberate: first the learning goal, then the core tool, then the consumables and safety items that keep the tool usable.
| Tool group | Typical examples | What it helps students do | Buying check |
|---|---|---|---|
| Observation | Compound microscope, stereo microscope, hand lens, digital camera | Magnify cells, insects, tissues, and small structures | Magnification range, illumination, stage control, spare bulbs or batteries |
| Measurement | Graduated cylinders, pipettes, balances, pH meters, thermometers | Prepare solutions and record accurate conditions | Accuracy, calibration, chemical resistance, replacement tips |
| Dissection | Scalpel, scissors, forceps, probe, tray, preserved specimen | Examine internal and external anatomy | Stainless steel, blade replacement, age suitability, ventilation |
| Models and specimens | Cell model, DNA model, skeleton, organ model, herbarium sheet | Visualize structures that are rare, small, or delicate | Curriculum match, storage, material safety, cleaning |
| Fieldwork | Nets, quadrats, sample bottles, insect observer, incubator, cage | Collect, observe, and monitor organisms in context | Portability, durability, ventilation, maintenance plan |
| Safety | Goggles, gloves, lab coat, eyewash, first-aid kit, spill neutralizer | Protect users and samples during investigations | Certification, correct fit, easy access, replacement supply |
The microscope remains the most widely recognized biology tool because so much of life is too small to see directly. However, the “most important” tool depends on the field. A field ecologist may rely on nets, quadrats, and GPS more than a microscope. A molecular biologist may spend more time with pipettes, centrifuges, and thermal cyclers.
No. Dissection is common in anatomy, zoology, veterinary, and some high school biology courses, but many biologists work with cells, DNA, plants, microbes, or ecosystems and rarely use a scalpel. When dissection is part of the curriculum, proper instruments, trays, gloves, and ventilation are essential.
Models are supplements, not automatic replacements. They clarify structure and are reusable, safe, and easy to label. Real specimens show natural variation, texture, and scale. Many programs use both: a model for introduction and a specimen or image set for detailed comparison.
Begin with the required practical activities. List what students must observe, measure, or dissect. Buy durable core instruments first, then add consumables and safety equipment. Keep a small budget for replacement parts, because slides, blades, bulbs, and calibration solutions are what keep the main tools working.
List the investigations first, then match tools to evidence. For each tool, ask three questions: Can students use it safely and independently? Can it be cleaned, calibrated, and repaired? Does it help students explain a biological idea rather than just complete a step? Those questions matter more than a long catalog.
If you are planning a biology laboratory or updating an existing set, our team can help you compare microscopes, dissection kits, models, specimens, and field equipment against your curriculum. You can contact our team for a practical equipment review, or read more about how to utilize biology teaching instruments effectively in daily lessons.
Recommended Products


+86-18630650508 +86-0574-62500588

+8618630650508

 No. 588, Chaoyang South Road, Ditang Street, Yuyao, Ningbo City, Zhejiang Province, China


 English
 русский
 Español
