2026-11-20
Content
A glider that slides to one end of the rail before you have even released it has already spoiled the lesson. The value of an air track experiment sits almost entirely in the air film: it takes the friction between two dry surfaces, typically 0.2 to 0.4, down towards 0.001, and that is what lets a 1.5 m rail demonstrate force, mass and acceleration with numbers a class can defend.
The working order is shorter than most manuals suggest. Level the rail using the glider itself, set the airflow so the glider floats with roughly a millimetre of clearance, and time the motion over the longest distance the rail allows. Do those three things and the standard experiments behave; skip any one of them and the data still looks tidy while quietly answering a different question.
Air from the blower fills a plenum inside the extrusion and escapes through rows of small holes along the working face. Pressure builds under the glider, the glider lifts, and metal-on-metal contact disappears. That is the whole mechanism, and it explains why the rail feels close to frictionless next to a wooden dynamics cart dragged across a varnished bench.
Friction is not the only force left in the system, though. Four others remain, and they decide how accurate the results can be:
The benchmark is simple: a glider released from rest at the centre of a clean, level rail should still be there half a minute later. If it has drifted a few centimetres, fix the setup before touching the stopwatch. Measuring the residual drag is also a worthwhile extension activity for senior students, because it turns an invisible error into a number they can defend in a report.
Bench the rail on something rigid. A folding table that flexes under a student's hand will undo every adjustment you make. Work through the checks below in order, because raising the airflow before levelling simply hides the tilt.
| What you see | Likely cause | Practical fix |
|---|---|---|
| Glider creeps one way when released from rest | Rail not level, or the bench itself slopes | Turn one foot in half turns, then repeat with the glider reversed to confirm |
| Glider slows visibly along the rail | Airflow too low for that glider, or blocked holes | Raise the blower setting and clear the hole row with a soft brush |
| Velocity readings scatter by more than two percent | Gates too close together, loose flag | Space the gates 0.5 to 1.0 m apart and tighten the flag screw |
| Head-on collision does not reverse cleanly | Weak or misaligned magnetic bumpers | Replace the bumpers, check alignment, film one collision slowly |
| Timer misses a gate or double-counts | Gate misalignment, room light on the receiver | Realign the bracket and shade the receiver with a card |
Once the checks pass, write the glider masses on the gliders themselves. Two "identical" gliders can differ by several grams, and in momentum work a 5 g difference on a 200 g glider is a 2.5 percent error before the first run has even started.
Two photogates spaced half a metre to a metre apart give average velocities that combine neatly: acceleration equals the velocity difference divided by the elapsed time, or the difference of the squares divided by twice the distance. A single gate with a wide flag gives one instantaneous velocity and is fine for uniform motion checks. Ticker tape at 50 Hz still works and costs nothing, but 20 ms intervals are marginal for short runs.
The uncertainty usually comes from the flag width and gate alignment rather than from the electronics. Measure the flag with a caliper instead of a ruler, keep both gates at the same height above the rail, and let the blower run for two or three minutes so the airflow settles. Five runs per condition, with the mean and spread reported, teaches more about experimental physics than any single perfect result.
A timer that resolves 0.1 ms is far finer than the experiment needs. Wider gate spacing will improve the data more than a timer upgrade will.
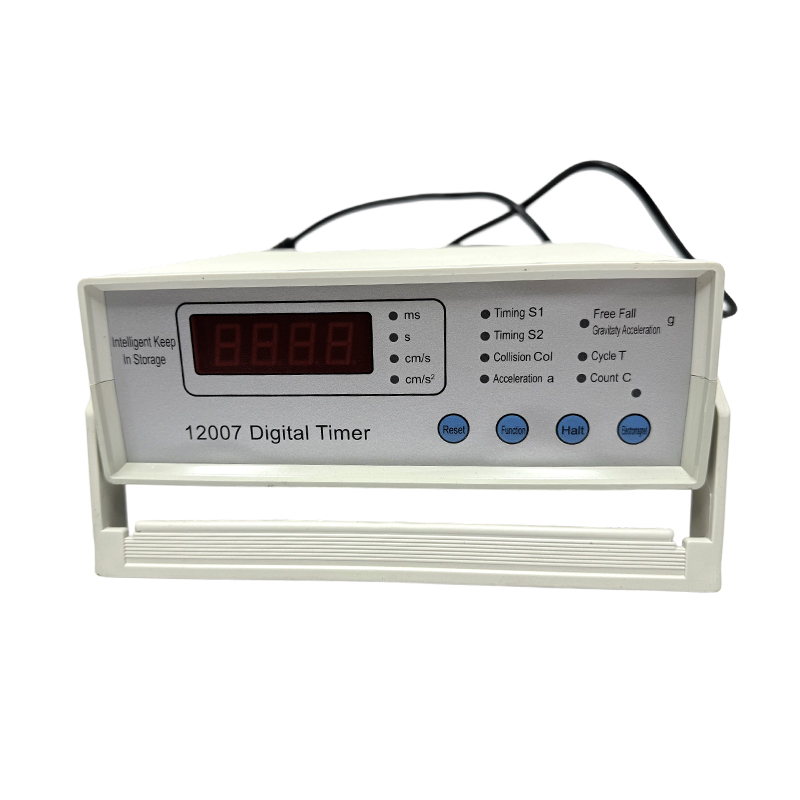 X0103 Digital Timer with Photogates for Physics LabsA 0.1 ms-resolution timer with 4-digit LED display and memory, suited to school mechanics experiments with air tracks and photogates.View Product →
Momentum work is where budget equipment shows itself. Bumpers that do not face each other squarely turn an elastic collision into a glancing one, and the totals stop matching. A dedicated collision apparatus with a straight, guided track makes the demonstration repeatable in front of a class.
 X0392 Collision Test Device for Momentum ConservationAluminum-track ball collision apparatus with scale lines and assorted balls, designed for student group experiments verifying conservation of momentum.View Product →
For the force-and-acceleration lesson, a purpose-built demonstrator is often the difference between a graph that convinces a class and one that needs apologising for. Look for a unit where the hanging mass path is short, the pulley turns freely, and the cart or glider mass is stated rather than estimated.
 X0413 Newton's Second Law Demonstrator for Mechanics LessonsTwo-layer track with linked trolleys that start and stop together, built for junior high mechanics experiments verifying Newton's second law.View Product →
A drift of two or three millimetres in thirty seconds is a good target. Beyond that, a hundredth of a radian of tilt contributes about 0.017 m/s², which is comparable to the effect being measured in low-force trials.
Residual air drag, pulley friction, the mass of the glider not being exactly what the label claims, and a flag width measured with a ruler rather than a caliper. A shortfall of one to three percent is normal and worth discussing with students.
Yes, unless the supplier offers a manifold with a verified flow rating. Compare flow figures rather than motor power, and check that the rated flow is quoted with a glider fitted.
With magnetic bumpers for elastic collisions and clay or hook-and-loop pads for inelastic ones, yes. The limiting factor is rail length: shorter rails force students into fast, short runs where timing errors dominate.
As pre-lab familiarisation, it helps. As a replacement it removes exactly what the exercise teaches: levelling, airflow adjustment, and the discomfort of data that does not quite fit.
An air track experiment is really a test of laboratory discipline. Ten minutes of levelling, airflow adjustment and flag measurement at the start of a lesson buys data that a class can argue about on the merits, which is what the exercise was for in the first place.
Recommended Products


+86-18630650508 +86-0574-62500588

+8618630650508

 No. 588, Chaoyang South Road, Ditang Street, Yuyao, Ningbo City, Zhejiang Province, China


 English
 русский
 Español
